Is there a specific font that you want to use in Microsoft Word, but find that you don’t have that font on your computer? Would you like a simple but complete step-by-step guide to show you how to do this?
To install one or more fonts onto your Windows computer, follow these steps.
1. Download the font from a reputable website.
2. Extract the contents of the zipped file to C:\Windows\Fonts.
3. Open Microsoft Word and select the font from the font drop-down menu.
In this article, I’ll walk with you through each step, complete with screenshots, showing you exactly how and where to download and install a font so that you you can use that font in your Microsoft Word document.
Step 1: Download the Font from a Reputable Website
There are certain websites that have a reputation of having a plethora of fonts available for download for free. Yes, free. We are going to look at two such websites so that you can find the perfect font for your needs.
It is worth stating, however, that you do not want to simply google, “your-font-name”. The reason you do not want to do this is because you will find that it takes you down a rabbit trail, full of pop-ups that will attempt to hi-jack your web-browser. Once you close one pop-up, another one will pop-up in it’s place, advertising everything from cookware to pornography.
Let’s stay safe, and go to one of two very reputable websites that are known for delivering the goods. Chances are that if either one of these two sites do not have the specific font you are looking, you will have to purchase the font in question.
Google Fonts
At the time of this writing, there are 959 font families for you to choose from. Each font family will generally have bold, medium, light, italic, thin, and other properties that determine it’s appearance.
One thing that I really like about searching for fonts on this website is that you can type in a phrase at the top of the page and as you scroll through all of the available fonts, you can see exactly what that phrase will look like in each font. That comes in real handy when the font that you are looking for is specific to a given occasion. This feature allows you to see what it looks like in context before you even download the font.
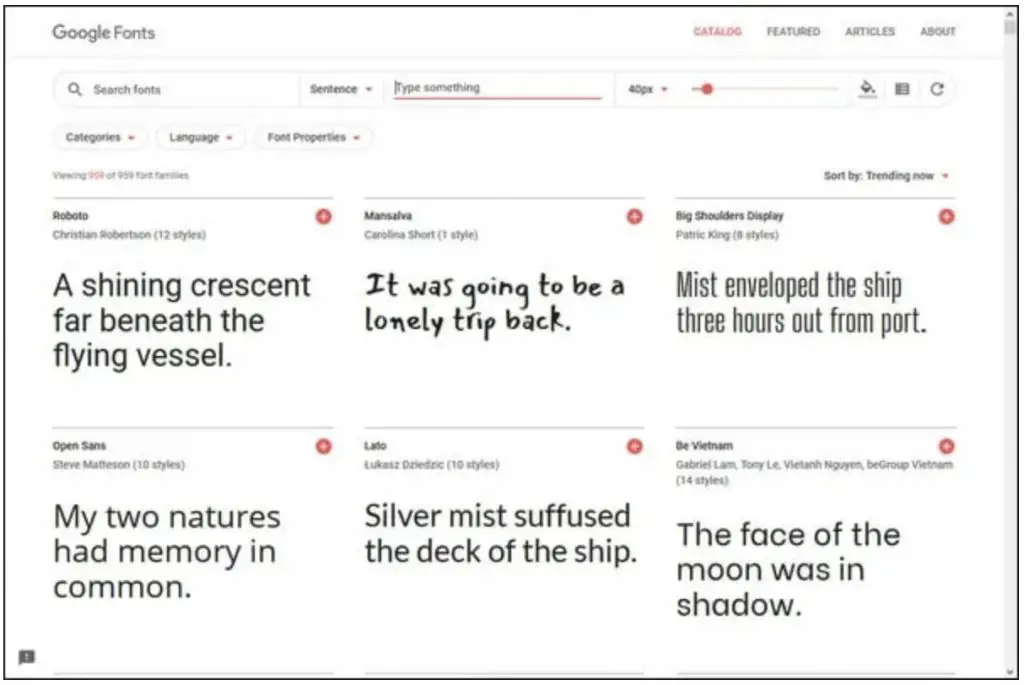
Note that this site allows you to do all of the following:
- Enter the name of the font (if you want)
- Type in a word or phrase
- Change the size of the font
- Determine the background color, (black or white)
- See the results in a grid format or column view (as displayed above)
- You can even determine category, language and font properties.
Once you find the font that you want to use, (in our case, we will download the “Roboto” font ), click on the little red “+” image. Once you do, you’ll see that the font has been added to your queue and will appear at the bottom of your browser which looks like this:

Once you click on this brown bar, the following dialog box will appear from the bottom of your screen.
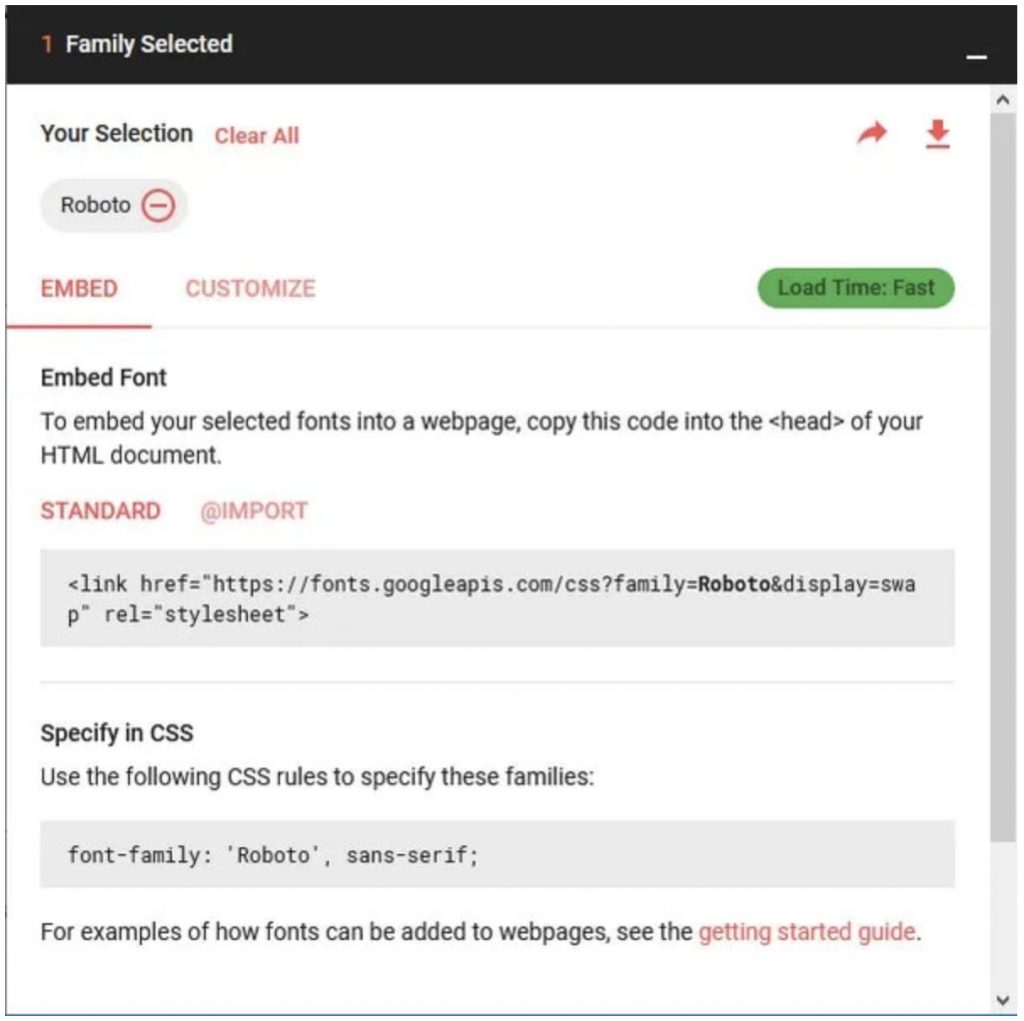
As you can see, you can do way more than simply download the font to your computer to use in Microsoft Word. Here, you are offered instructions on how to implement the font in question on your website.
At the top right hand side of this dialog box, you can download the font by clicking the downward arrow. Once you do, you will see the following:
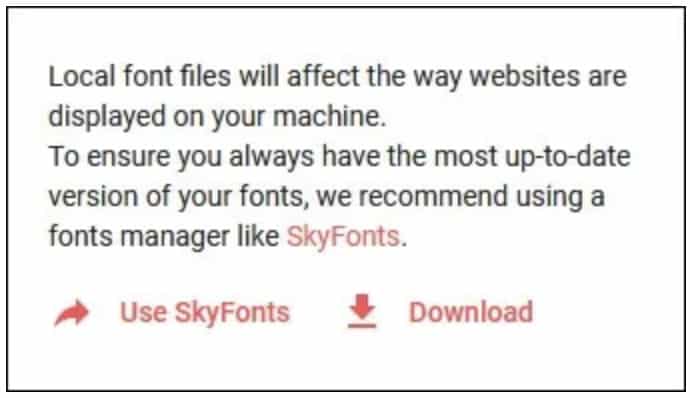
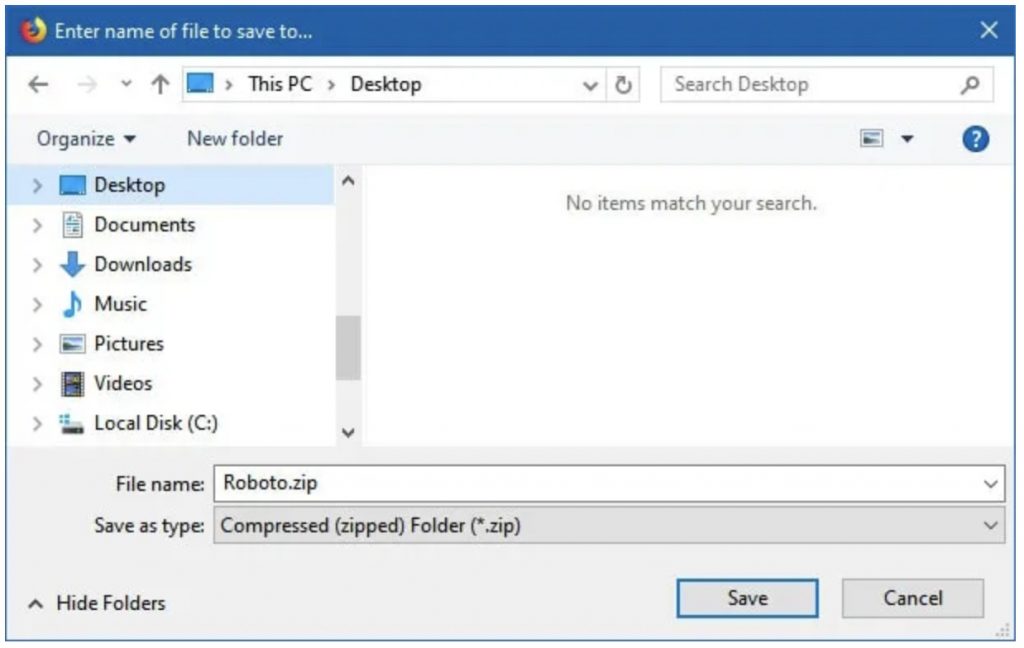
Once you click on the DOWNLOAD link here, you will be presented with the Windows download dialog pop-up window. Be sure to click the SAVE FILE radio button (shown below), and click the OK button.
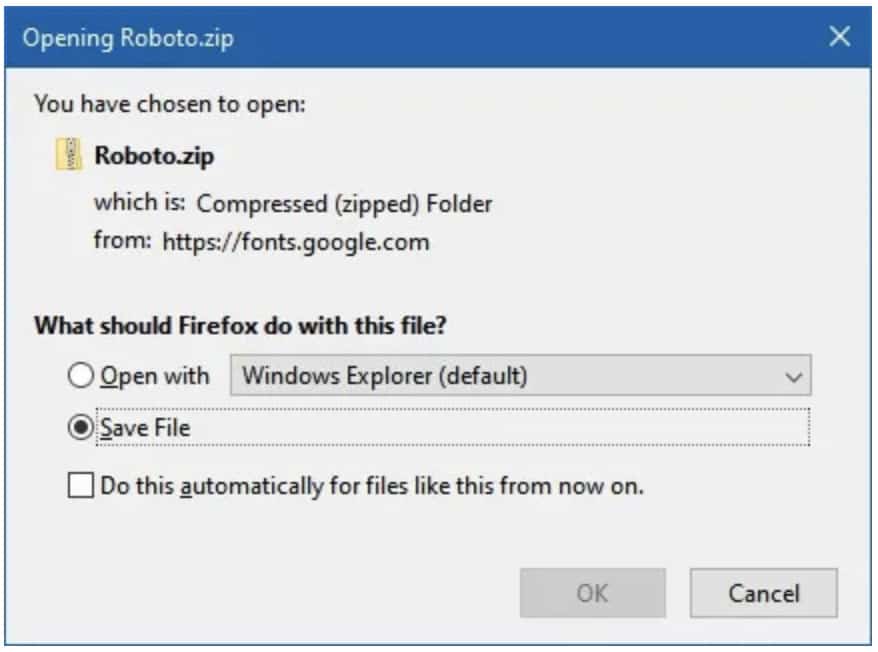
You can now save the file to your desktop.
In a minute, we will then extract the contents of this file to the C:\Windows\Fonts directory, but before we get ahead of ourselves, let’s take a look at one more reputable website where you can get just the right font for your needs.
Font Squirrel
While Font Squirrel may not have all the bells and whistles that Google Fonts has, you may find that it offers more fonts than Google fonts. I’m not necessarily talking about different fonts, but using our example of the “Roboto” font, FontSuirrel offers 18 Roboto fonts in that one download, whereas Google Fonts only offers 12 fonts.
Not all of the fonts available at fontsquirrel.com are free, but most of them are, and they are completely license free, meaning that you can use them anywhere you want.
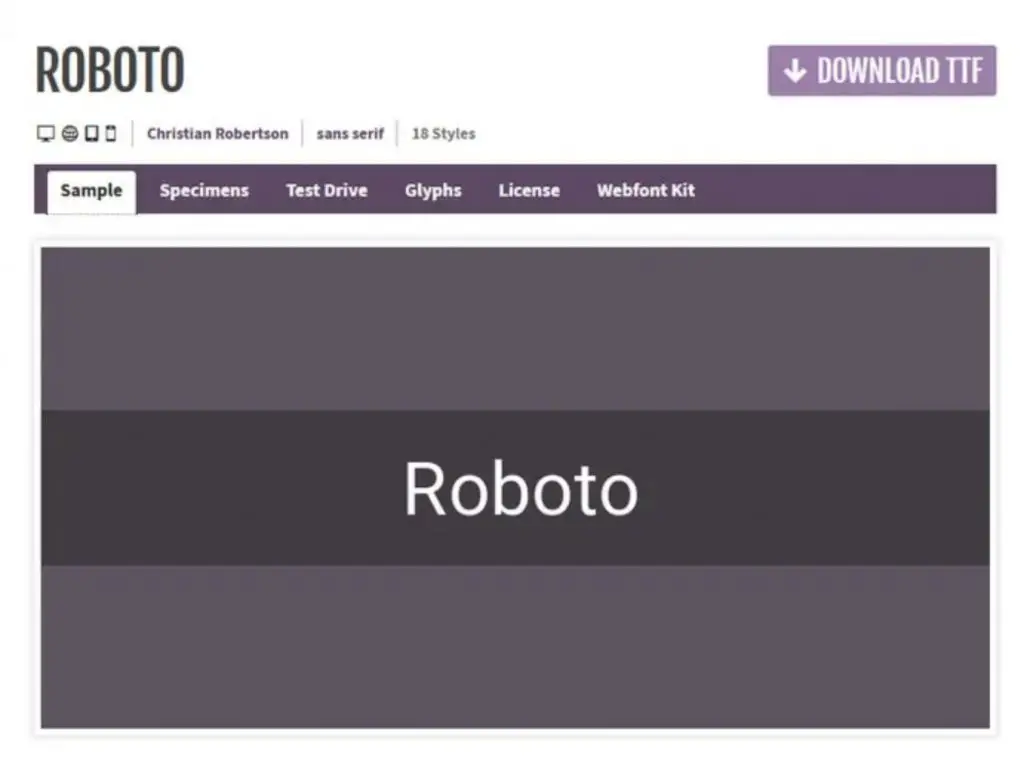
If you wish to “test drive” the font, you can do so by simply clicking on the TEST DRIVE tab. To see what each of the 18 fonts look like, simply scroll down and you’ll see the following:
If want to simply download the font, click the DOWNLOAD TTF button at the top right and save it to your Desktop.
Step 2: Extract the Fonts
If you have any third-party zip utility installed on your computer such as WinZip, 7-zip, or WinRAR, you can use them to extract the contents of the zipped file on your desktop. You just want to make sure that you extract the TTF files within the zipped file to your Desktop.
Windows 10 has a built-in utility that will easily allow you to do this. Let me show you how.
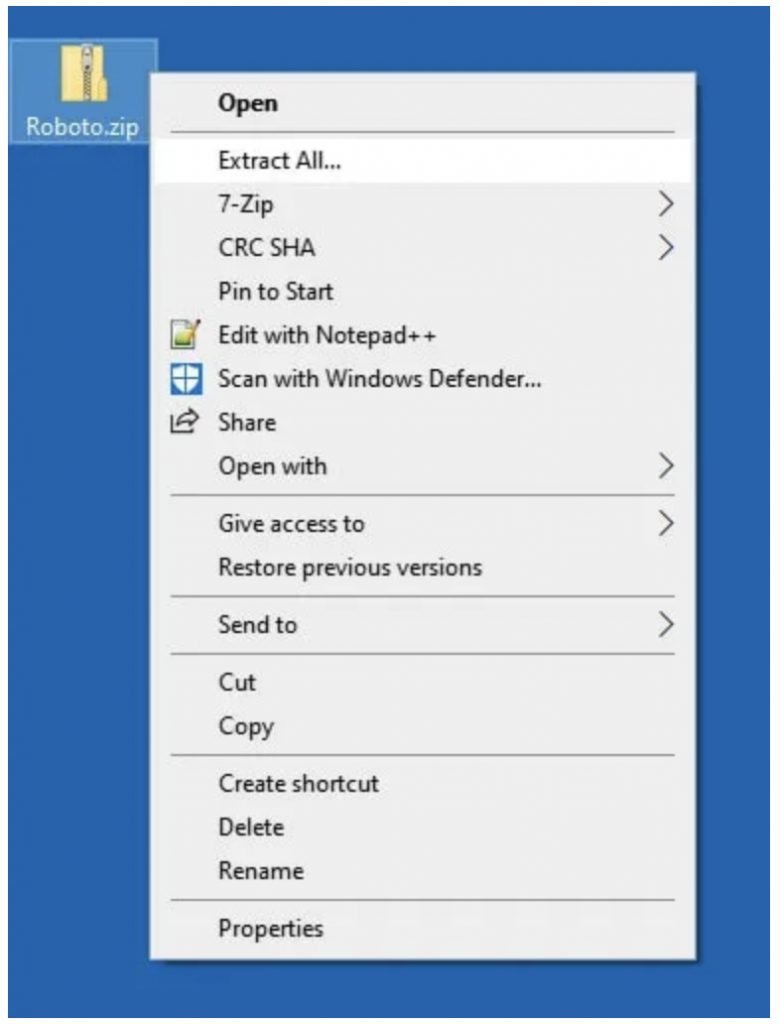
The first thing you need to do is locate the zipped file on your Desktop. In our example, we saved the Roboto.zip file to our Desktop. Now, right click on it and click EXTRACT ALL.
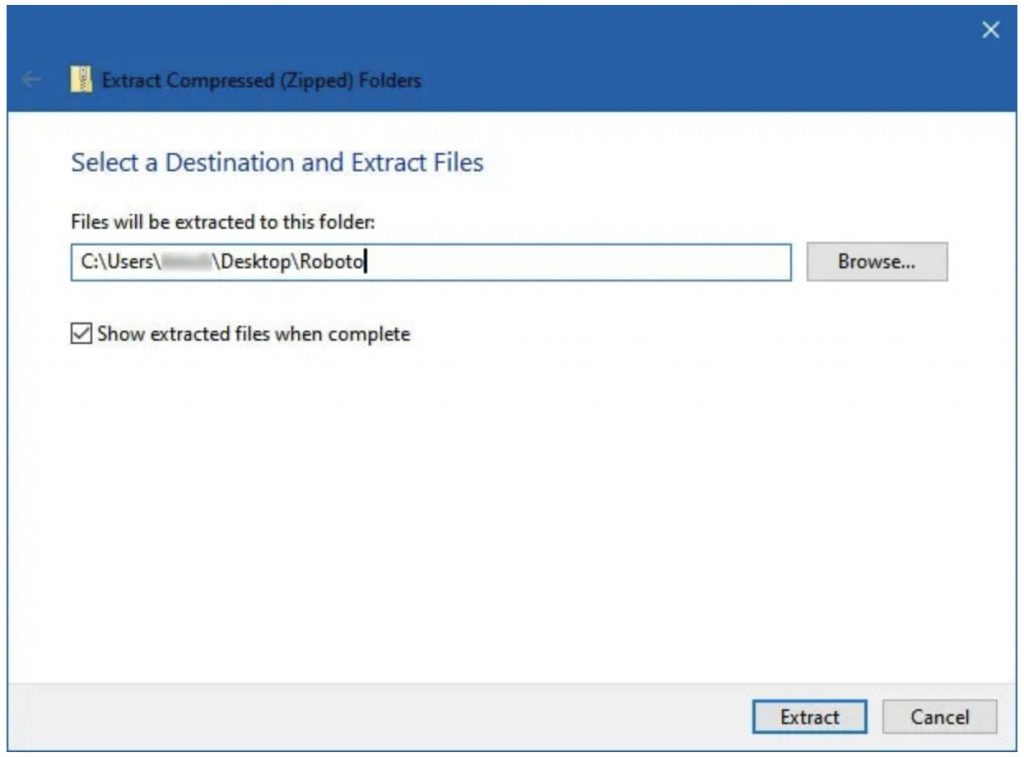
After clicking EXTRACT ALL, you will be presented with the following dialog box. It is here that you want to accept the default option and extract the files into a folder called “Roboto” on your Desktop. Ensure that you place a check in the checkbox to “Show extracted files when complete” before you click on the EXTRACT button at the bottom of this dialog box.
You will now see the following files in a folder located on your Desktop, named, Roboto. Do not close this window. Instead, move that open folder over to the left side of your screen for now. We will come back to this in minute.

We now need to open another Windows Explorer window. You can simply do this by clicking FILE from the already open File Explorer window and clicking and then clicking OPEN NEW WINDOW.
You should now have two Windows Explorer dialog boxes displayed on your Desktop. Drag the newly opened Windows Explorer dialog box to the RIGHT side of your screen and navigate to the C:\Windows\Fonts directory.
For clarification, the Windows Explorer dialog box on the LEFT side of your screen shows the contents located at C:\Users\<your user name>\Desktop\Roboto. The Windows Explorer dialog box on the RIGHT side of your screen shows the contents located at C:\Windows\Fonts.
Now, in the left window, select the LICENSE.txt file and hit the DELETE key, so that the only remaining files are all .TTF files. Highlight one of the TTF files and then press the CTRL-A keys to select all files within the Windows dialog box on the left side of your screen, and press CTRL-C to copy the files to your Clipboard.
Now select any one of the TTF files in the the Windows Explorer dialog box on the RIGHT hand side of your screen, and press the CTRL-V keys to paste all the contents from the Clipboard into this directory.
You can now close both Windows Explorer dialog boxes.
25 Basic Computer Tips for Windows!
Windows Simplified for the Everyday User
Download Your Copy Today!Step 3: Select the Font From the Drop-down Menu
Believe it or not, all the hard work is already done. If Microsoft Word is already open, close it and then re-open it. Once Microsoft Word has launched, select your newly installed font in from the font drop-down menu as shown below. Now you can use that font in your Microsoft Word document.

Closing Thoughts
Of course, there numerous other sites that you can use to obtain fonts. Some are free, and some you will have to pay for. Just be sure that you have a license to use the font in question for any commercial use. You definitely do not want the hassle of dealing with a law-suit for using a font that you could have easily purchased for $15.

Tim Chesonis
Tim has been helping people with computers needs for several years, and he loves to help people succeed. He brings a wealth of wisdom and insight from an entrepreneur's perspective and enjoys freelance writing. In fact, when he's not writing an article, you might find him binge-watching Suits or formatting his computer . . . again, just for fun. To learn more about Tim, click here.25 Basic Computer Tips for Windows!
Windows Simplified for the Everyday User
Download Your Copy Today!